SAP Business One Data Transfer Workbench Tool

Welcome to our blog on the SAP Business One Data Transfer Workbench (DTW)! As a small or mid-sized business, you know how important it is to manage your operations efficiently. And a big part of that is uploading and managing large amounts of data in your SAP Business One system.
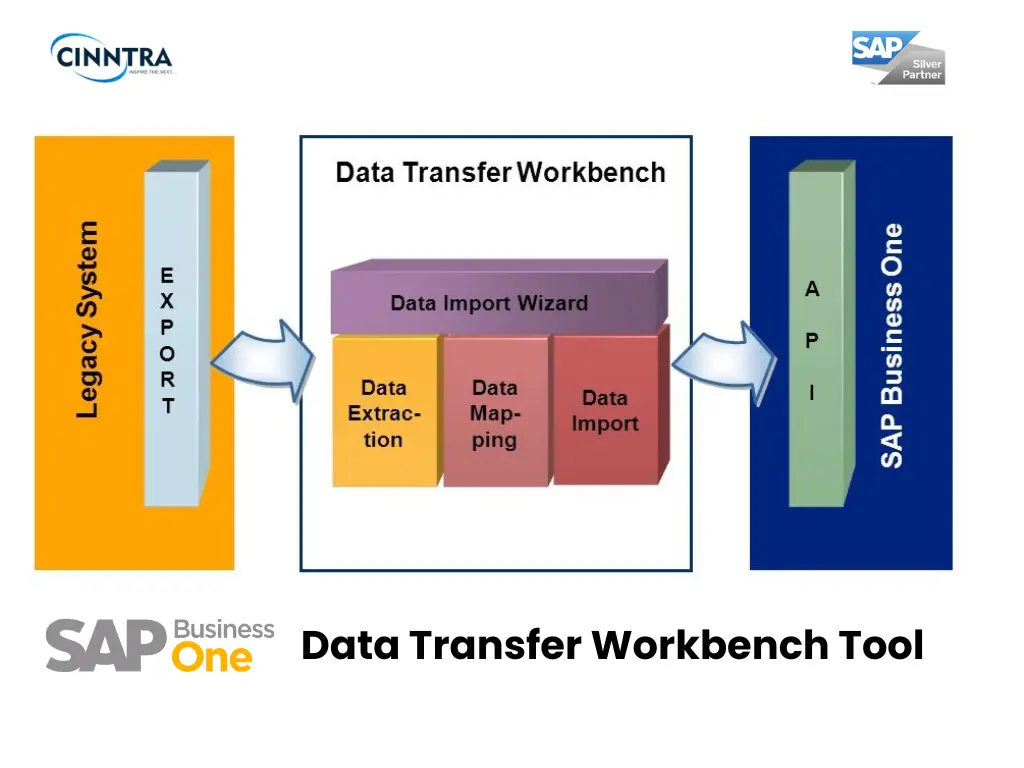
That's where Data Transfer Workbench comes in. It's a powerful tool designed to simplify the process of transferring data to and from SAP Business One. With DTW, you can transfer master data, transactions, and other information from one SAP Business One system to another, which is especially useful for companies with multiple locations or subsidiaries.
But using DTW effectively can be tricky without some guidance. That's why we've created this user-friendly blog to walk you through the features of DTW, as well as provide best practices for using the tool effectively.
By the end of this blog, you'll have the knowledge and confidence to use DTW to manage your SAP Business One data more efficiently, freeing up your time to focus on growing your business. So, let's dive in and explore the power of the SAP Business One Data Transfer Workbench!
Data Transfer Workbench - Quick Overview
The data transfer workbench is a tool for bulk uploading data in the SAP B1 database. Using DTW, we can import new data, add new and update existing data, and update existing data. There are three kinds of data that can be imported using the DTW tool-:
1) Master Data - Master data refers to importing master data into SAP B1 like-: Item Master Data, Chart of accounts, business partner master data, etc.
2) Setup Data - Setup data refers to importing setup-related data into SAP B1 like-: Customer Groups, Vendor Groups, Item Groups, etc.
3) Transactional Data - Transactional data refers to importing transactions/transaction-related data into SAP B1 like-: Sales Orders, Delivery, AR Invoices, Purchase orders, Goods Receipt Purchase Orders, AP Invoices, etc.
How to Log into Data Transfer Workbench - Step-by-Step Guide
Step 1- To initiate the Data Transfer Workbench, we must first click on the "Start" button and proceed to type "Data Transfer Workbench" in the search bar. Subsequently, we open the application by selecting the "Run as Administrator" option. Following this, the DTW application window will appear.
Step 2 - Upon selecting the desired database, the user must log in to begin importing data. Once logged in, the screen will display the selected database at the bottom of the window, as indicated by the highlighted area in the accompanying screenshot.
Step 3 - Next, the user should click on the "Import" button to proceed. This will prompt a dialogue box where the user should select the desired type of data to import using the DTW tool. The available options include "Setup Data," "Master Data," and "Transactional Data." Once the desired option is selected, click "Next" to continue.
For instance, in the example of importing Item Master Data, the user should select the "Master Data" option and proceed as indicated in the accompanying screenshot.
Step 4 - Here we are importing new data and clicking on the Next button.
Step 5 - Afterward, select Inventory and Item Master Data and click on Next.
Step 6 - Here we select a file and click on the Next button.
Step 7 - Subsequently, run a simulation to detect any errors in the file. If errors are detected, resolve them before proceeding further.
It is imperative to ensure that all errors have been resolved before proceeding to avoid any potential issues in the data transfer process.
Step 8 - Then we finally import the file with no error and data gets imported into the system as required.
Bringing It All Together:-
In conclusion, the SAP Business One Data Transfer Workbench (DTW) is a powerful tool for managing large amounts of data in your SAP Business One system. By using DTW effectively, you can transfer master data, transactions, and other information from one SAP Business One system to another. Follow the step-by-step guide provided to confidently use DTW and manage your SAP Business One data more efficiently.


1 Comments
shubham singh
What are the steps to do goods receipt from production using the DTW for backflush